Wednesday, May 22, 2013

Camper Renovation - Sewing, Beads and Fabric

So guess what - we took Libby camping! It took two weeks of intense work to get her "camp ready" and we had a lot of fun on the test run. There were a few things to fix or adjust but it went great. My mom was awesome and sewed our new camper cushions. My dad installed our new air conditioner and made sure the fridge wasn't going anywhere. Here's some photos of the cushion making madness...


I thought the cushions that came with our camper were great but since we made the bed bigger, we needed new cushions. We are pretty sure that the cushions were not original as the foam was just in too good of condition. 50 year old foam would have been all well... old, stinky, stained and/or grainy. They must have been made by some previous owners before my cousin bought the camper. 


Since our cushions make the bed I just had to add a layer of memory foam on top of each cushion. I ended up buying two memory foam mattress toppers in queen size (1.5" thick) and cut them up for the cushions. I also just used the foam from the original cushions (and added foam where needed.)


We closed up the backs of the cushions with velcro so that the covers could be removable and washable.


Just another one of my projects - this one is still a work in progress! My dad took the original chandelier and painted it white for me. Ok, I should say that I painted it white and made a huge mess of it. Then my dad exclaimed "didn't anyone teach you how to shoot paint?" and proceeded to sand blast it and repaint it. It looks great now. I have since been stringing different beads to hang on it. It's going to be filled with beads of all colors.


Cushion test run...


And here's just a little picture of our Libby at Tyler State Park.

Sunday, April 28, 2013

Big Hair, Little Shorts and Super Cute Babies

I've spent a lot of time with my family lately. One evening we sat around my aunt's table pouring over old family photos. These photos made us laugh. They made us smile. And we laughed some more. There was plenty of big hair and little shorts. Super cute babies and way too much fun. I snagged a few with the promise to bring them back safely. Wanted to scan some of my favorites and share them with you.


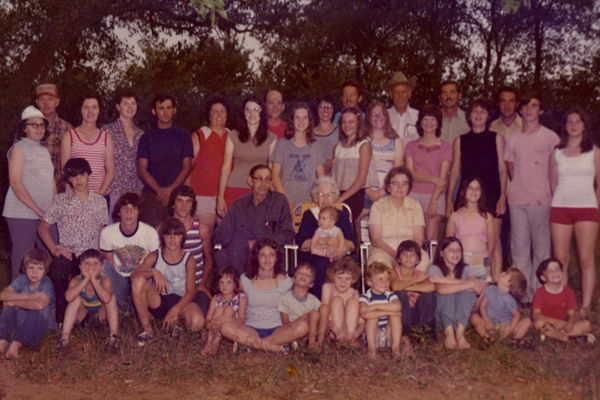
My mom's family reunion, 1976 or 1977. My brother is the little boy on the bottom left in the blue and yellow shirt (hands on his chin.) My sister is the little girl in the flowered shirt just to the right of him. My mom is in the red shorts and tan shirt - towards the middle of the back row. Oh and there's my dad! He's two spots to the left of my mom in a navy shirt. Awww.


I love this picture so much. There's my grandma and grandpa in the middle, and see the girl on the bottom right with the banjo? My beautiful mom! Not to mention my awesome aunts, uncles and cousins.


On my mom's side of the family, Aunt P and Uncle D were the first to get a camper so everyone dubbed Aunt P the Camper Queen. It was a super cute brand new Williams Craft camper! I forgot to ask what year they got the camper. These two photos were taken in the 80's.


My aunt with her first born son. And just look at those cars in the background. 


Aunt P, on Christmas Day with her new bike. Check out that vintage camper of someone's in the background. Love the car too.


Remember when perms were the rage? I think everyone had a perm that year. p.s. nice shorts, cousin G.

Tuesday, April 2, 2013

Camper Renovation - Glitter Painted Ceiling

I've always had a crush on those old school glitter ceilings. You know the ones with the popcorn ceiling that had flakes of gold or silver glitter? Well of course I just had to have some kind of glitter bling going on in the camper, but how to do it?

There was this pin all over Pinterest about just dumping a jar of glitter in paint to make a glitter wall. After much research that pin was deemed bogus. Dumping a jar of glitter in paint would just coat the glitter. Then I discovered Valspar paint crystals. These paint crystals are used to make the glitter effect when painting faux granite. You can buy them in gold or silver.

Since I was painting the ceiling of a tiny camper, I only needed a quart of paint. I used Behr teal ice. I happily dumped two bags of paint crystals into my paint can (I wanted it to be real glittery) but soon realized there wasn't enough room to stir it up! So I had to dump the paint into the pan and stir it up that way.


I really like how the glitter ceiling turned out. It's subtle and it sparkles when the light hits it. I still need to buy and install the air conditioner and I'm currently finishing out all the white trim work. I'm also ready to put the window screens back up. Then it will be time for the floor.

Tuesday, March 19, 2013

Camper Renovation - Bright and White

I was finally able to get back to painting (this is all primer) and any day now I will start adding a coat of finished white the colors. It would be great to just be done with the white and leave it as primer but unfortunately primer isn't washable and just has this chalky finish. Here are the latest pics taken as of this week.


Stay tuned for more updates.